Showing posts with label decor. Show all posts

Friday, January 23, 2015

Valentine's Mantle {& Why We Celebrate}

Confession: I just took down our Christmas decor yesterday. 

That's totally out of character for our house. I like it down before New Year's but my husband prefers to keep it up until New Year's Day. It all has to do with the way we were raised and 'how it was done when we were kids.' 

This year, though, is a weird year for us. We are living temporarily in an apartment while our house is being built. This apartment happens to have one overhead light and it's hanging over the fireplace. And it's florescent. {read: horrible lighting choice} Our lamps are mostly still packed in boxes from our move 5 months ago. We really have no idea where they are. I guess we are mostly hoping they made it here to northern KY with the rest of our unpacked stuff. 

That said, our Christmas tree provided a lot of nice lighting for this dark, tiny space. That's the main reason I left it so long. The other reason? We were busy with a lot of things like homeschooling, traveling and trying to stay warm next to the space heater. 

It's down now and all the fake tree needles have been vacuumed up; the few decorations have been packed away.

 I knew before taking down the wreath over the mantle that I was going to decorate it for Valentine's Day. Nobody likes a naked mantle! And seeing how that's really the only place in the apartment to decorate seasonally, I started gathering things from around the house. 

Last week, I bought the cute red heart garland from Dollar Tree. I love red and I love hearts so it was a no-brainer. 

The metal arrow marquis sign was a Christmas gift from my sister. I love it. And I'll be using it often. Because again, I love red. Red goes with everything. 

The chalkboard I've had for a long time. I {heart} chalkboards. I know I'm not alone in that. So, I cleaned it off really good and decided to write something simple, but meaningful. Love. That one word sums up a lot of my life - past & present. It has more meaning than I could even describe here {without using up a year's supply of Kleenex and bringing everyone to tears - maybe some other time}. 

The pretty flowers are from a bouquet that my sweet husband bought me for our 13th anniversary on the 5th. I just cut the good ones that were still living down to fit into smaller vases. 

My friendship sign fits perfectly in this little happy place. It was given to me by a dear friend the day before I moved away. It holds a lot of meaning and makes me miss my people SO much but is a great reminder of the abundant love in my life.

The polka dotted covered books I put there because my sister does it all the time. Just cover books in various sizes in your favorite wrapping paper.

Do you celebrate Valentine's Day? We celebrate in this house. My husband and I get each other a small gift and we give the girls small gifts with hearts and X's and O's and other symbols of love. Love is a big deal in our house. I hope it always is. But the main love we celebrate and want our girls to know beyond a shadow of a doubt is this:

Herein is love, not that we loved God, but that he loved us, and sent his Son to be the propitiation for our sins.

We love him, because he first loved us. (1 John 4:10, 19 KJV)

I've had this on my mind so much in these last few days. I'm so thankful for love. I've been blessed with so much love in my life, but the greatest love is God's love. 

Unconditional. Perfect love. Love that cannot be earned. Freely given. 

God loves me {and YOU!} not because we loved Him first. Because we didn't. Only because He loved us first and proved it by sending His only son, Jesus, to be the sacrifice for our sins. A price we could never pay. To give us eternal life in Christ! That's love. 

And that's why we celebrate love. We celebrate in tangible ways and express love the best we know how in our silly ways.

How do you celebrate love?

Wednesday, December 11, 2013

Simple Christmas Decorating

 
In the spirit of Christmas and all the fun things that go along with this most wonderful time of the year, I decided to show you my simple Christmas decor this year. I didn't do a ton of decorating. In fact, I've got about 3 tubs of Christmas decor that I'm not using this year plus 2 artificial trees in the attic. I even debated on whether to put up my dining room tree this year, but I did and I'm so glad I did. The girls are enjoying seeing it lit up in the evenings and so am I! I love looking at all the Christmas home tours on the blogs, (although I haven't gotten around to it yet this year) and seeing how other people decorate their homes. Everyone has a style all their own and I thought I'd show you a quick peek of my very simple Christmas decor this year {I keep adding to mine when a good idea comes my way, but this is what it looks like for now.}
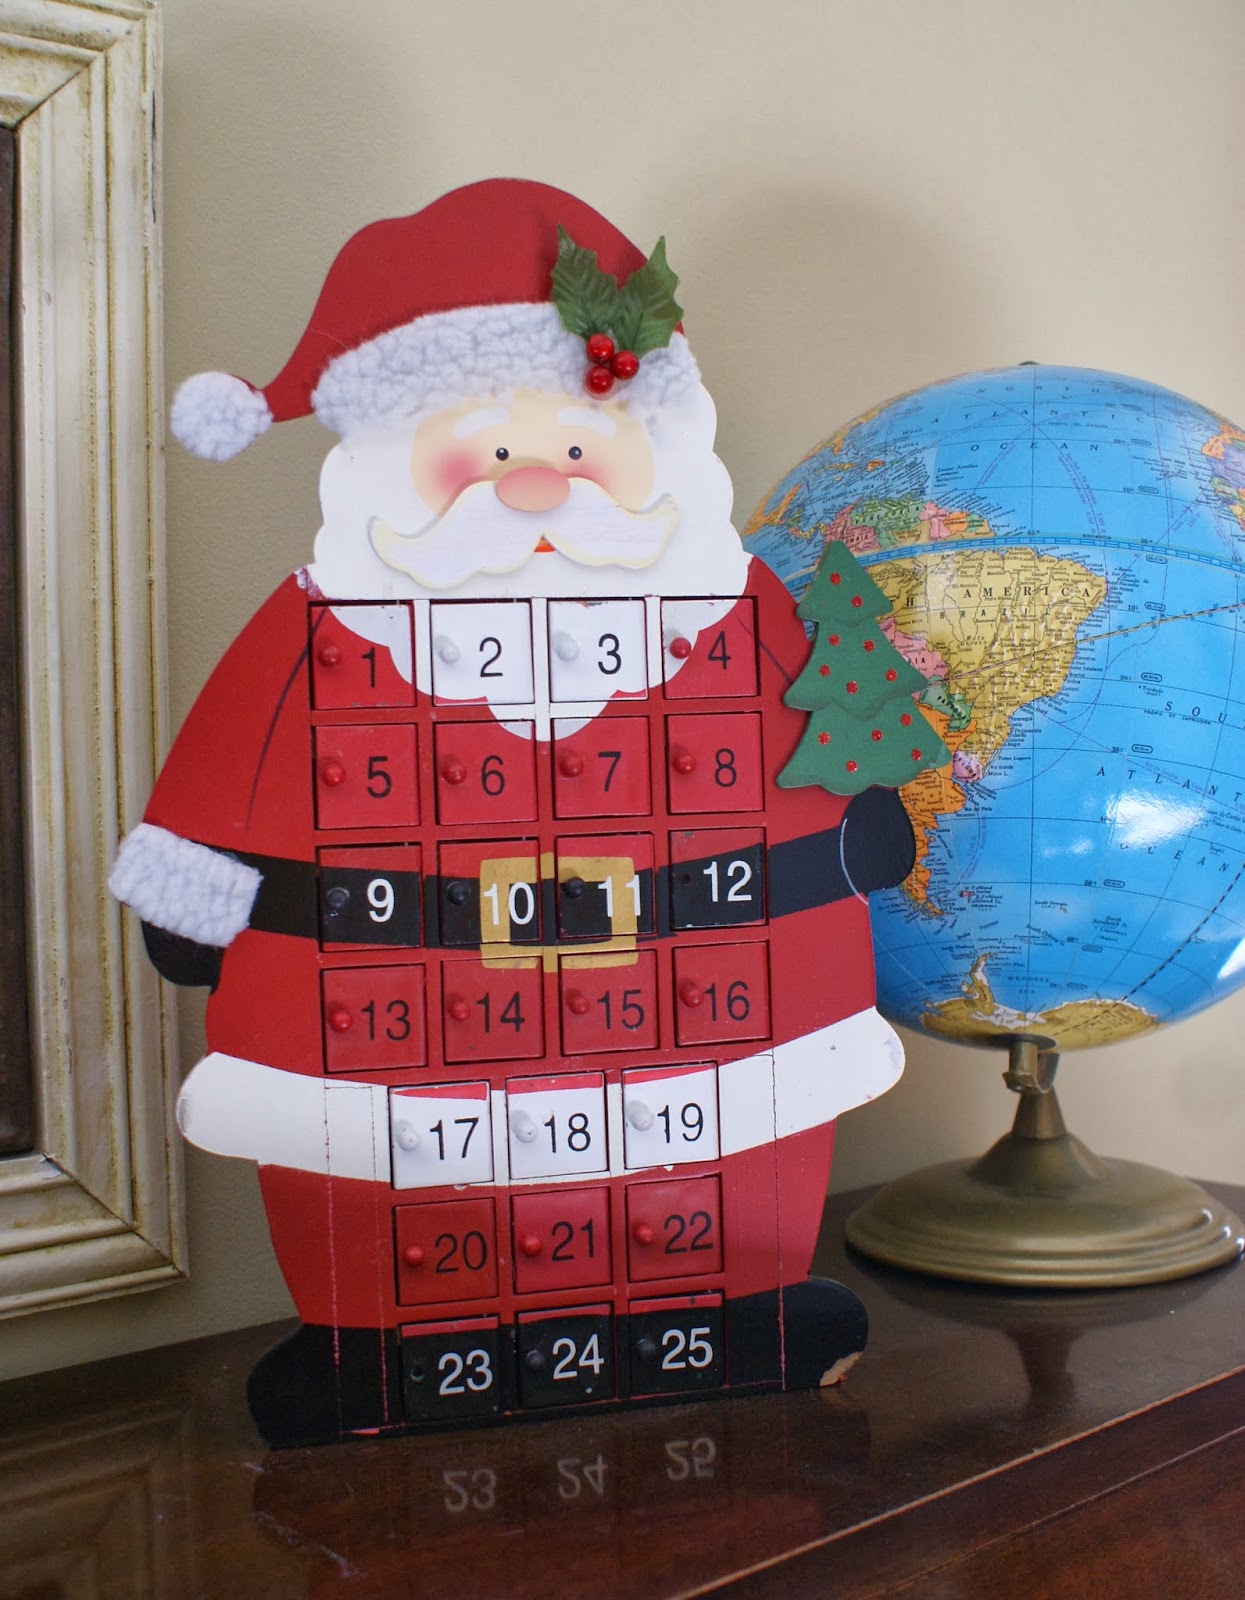
I got this cute Santa Advent thing at Target a few years ago on an after-Christmas clearance deal for just a few bucks. We use it every year and it's one of the girls' favorite pieces. I thought it was appropriate to put him next to our globe on top of the piano so he could go ahead and map out his route. You can find one like it here.
 These little ceramic mice have been in my family for as long as I can remember. I think they came from Home Interiors or something like that decades ago. Still in perfect condition. Another sentimental thing my girls look forward to getting out for Christmas each year. I found the baby mouse here if you are interested.
 It's not possible to have Christmas in this house without Brenda Lee singing to us. My mom let me keep these when I moved away after college. We used to listen to these actual records while decorating the Christmas tree way back when. I have these on my piano during Christmas, but listen to her now on Pandora Radio. I should have put a record player on my Christmas list! Find the Paul & Paula Vinyl here. And the Brenda Lee vinyl here.
 My simple mantle. I'm really loving it this year. I usually have it covered in garland and lights and all kinds of stuff, but this year I just really enjoy looking at the simplicity of it all. The stockings are a Pottery Barn knockoff from a few years ago. You can read about them here. The art on the mantle is part of a set of paintings my artistic friend painted of some of our landmarks in our city. Find more of her art here.
 This small tree is from Hobby Lobby. One of my girls decorated it for me with ribbon and some of my husband's vintage ornaments from when he was little. He made a couple of these with his Nana as a young boy and the others are too tiny for our big tree, but I wanted to display them.
 These are two of my husbands tiny biplane ornaments from his collection. He's in an aviation career and we love these little bitty planes. He has quite a collection of airplane ornaments, but these fit perfectly on our mini tree.
 These are part of my collection of knockoff Anthropologie Mason Jar Snow Globes. Read how I made them here. I just displayed them on one of our bookshelves this year. You can get the Count Your Blessings free printable here.
 This came from my in-laws to my girls as a gift several years ago. It's a Hallmark item and sings Jingle Bells while the dog barks. It's adorable....the first 20 times. After that, we have to limit the number of times the button gets pushed. Ha! You can find one of these here. They are not sold in stores.
 Perhaps my most favorite Christmas item is this small part of the Fontanini Nativity set. My aunt and uncle bought me this as a college graduation gift. I love this and would love to have the whole set one day.
 My wrapping paper colors this year. I love this combo. The little nutcracker men are so cute. I am especially fond of them this season. And the black and white chevron is always my favorite.
 A small glance at our living room decor. The most important part anyway. Maybe I'll show the whole room if I ever finish it the way I want to. For now, this is the happiest part!
 I like to hang some of our Christmas cards on this garland wrapped banister. It's the perfect place for the cards. We pass them everyday and love seeing notes and pictures of friends far and near. {Still waiting on many more to come! hint, hint}
 This is my sparse dining room tree. I love it because it is simple and is just enough decoration to enjoy and not dread having to take it all down and put it away. The paper garland in the tree is from Pottery Barn a few years ago. The handmade angel on top made with a paper plate and gold glitter? Yes, that's from my sweet 5 year old. She was so proud to put that on top of my tree. I think it's the perfect addition.
And last, but not least, is this wonderful smelling candle from Yankee Candle. Mistletoe is the very best Christmas/Winter scent ever! My sister has one every year and last year my husband finally decided he was getting one for us every year. The smell is fantastic! It's our second year of this tradition that will last a long time in this house if I have anything to do with it. Buy one for yourself here.

What are your traditional decorations? Do you use the same decor every year or change it up? If you've written about your decorations this season, please leave a link to it in the comments. I'd love to see yours!

Like this post? Will you please share it with your friends on your social media? You can also follow me on Facebook, Google+, Pinterest and Twitter. Click the social media icon of your choice in the right sidebar.

Merry Christmas!
post signature


This post contains some affiliate links. Thank you for your support of this blog.

Thursday, March 21, 2013

15 Minute Dropcloth Table Runner {Tutorial} + Centerpiece

My kitchen table is the most used table in the house. It gets eaten on, drawn on, colored on, crafted on, etc etc. It was the first table I ever bought and I've had it for 11 1/2 years. So, it's starting to look a little worn. I normally leave it plain or just with a vase of flowers on it because it gets used constantly, but after making my dropcloth curtains for the door behind it, I felt like it looked mighty plain. I started thinking about what to do and decided that since I happened to still have the dropcloth left out from these projects, I'd make a table runner out of it! It literally took about 15 minutes start to finish. It's as simple as sewing a straight line. Everyone can do it! So, if you need to brighten up an old table consider using this durable and washable dropcloth.

 If you want to make a quick and cheap centerpiece for Spring or Easter, this is what I made. My girls love it. It's simple and I think they just like having something Eastery on the table.

I spent $20 on two 4'x15' dropcloths at Big Lots and so far I've made these curtains, this kitchen curtain, this pillow cover, a tote bag {soon to come} and the table runner out of them. I still have quite a bit left to make many more projects! I'd say that's pretty thrifty.

What dropcloth projects do you want to make?

I'm sharing with these parties. Happy Spring!!

Monday, December 3, 2012

How to Hang a Wreath Almost Anywhere

I really like the look of wreaths big and small, especially at Christmastime. I have a few that I hang on our front windows for Christmas and some to hang inside in different places. A few weeks ago, I found some cute fake greenery wreaths at Hobby Lobby in all sizes. The smaller ones caught my eye so I decided to buy a few. I think the 8" wreaths were $1.50 each. How can you pass that up?? So, I got home and quickly decided to use two of them on my glass cabinet doors on our butler's pantry. That little nook needed some Christmas added to it. Here's how I did it without ruining our doors or cabinetry:

Then, for the third wreath, I decided to hang it above my chalkboard in a bare space. I'm so glad I did. I love it!
Last year, I hung a medium sized wreath over my mantle on my horizontally hung shutters by stapling ribbon to the back of the top shutter. Fresh wreath with glittery monogram hung in middle.

Here are some other cute ideas for wreaths I found on Pinterest.

I'm linking up with some of these parties!
Happy Decorating!

~ Amy


Monday, November 26, 2012

Joy to the World: Chevron Bunting {DIY}

In case you haven't noticed a trend here at my house, I have a thing for Chevron print. I've made two grey chevron skirts, chevron pillows, used chevron fabric around the bottom of my tree for a tree skirt and now I have a chevron bunting over my mantel. I think the chevron adds a vintage look to the Christmas decor and I am just loving it. I'm fully aware that it's a fad and in a couple of years I may not like it so much anymore, but right now, I adore it so bear with me.
To make the bunting:
Make a pattern for the size flags {triangles} you want. Lay them on your chosen fabric. If you're using stripes like this, you can try to center them or you can just be haphazard. I chose the latter because I wanted to conserve fabric. {I think it turned out nice!} Pin your pattern to the fabric and cut.
Pick out your ribbon, twine, jute, or whatever you want to use to hang your flags up. Measure it according to your measurements for where you are going to hang it. Be sure to add extra if you want your bunting to droop and if you want your ribbon to hang down on the sides. Then, find the center and pin your flags on, spacing them evenly.
Once pinned, I took the top edge and folded it over the back just enough to cover the ribbon. Then, I ironed it down to make it easier to sew. I tried to sew just under the ribbon, but sewed on the bottom edge of ribbon {sewing through all three layers} to hold it in place. I don't want my flags to slide.
Last, I took a big, black Sharpie and drew each letter on each flag. I used my pattern cutting board as a guide to know where to write each letter so they would all be the same size. I did mine two inches high.
Finally, just hang them up!


I am thrilled with how mine turned out! Hubs even commented on how much he likes them and he normally doesn't get all excited about buntings. :)

Stay tuned for more Christmas posts like this. And in case you missed them, check out my easy DIY Chevron Throw Pillows and my Anthro-inspired Snow Globe Mason Jars.

I'm linking this up with some of these parties.

Friday, November 23, 2012

Chevron Throw Pillows {How-To}

I've already begun decorating for Christmas around here and as I looked around my living room after the tree was up, it looked rather unbalanced. Our tree is in front of a window and directly beside our fireplace. I love how the tree looks next to a decorated mantel, but that left the rest of the room kind of plain. So, I decided it was high time to make some new pillows for the couch to match the tree skirt and try to pull the look together. If you have been wanting new throw pillows, this is a very simple and quick DIY project that anyone can do. If you can sew a straight line, you can make a pillow.
Lay your fabric right sides together. Then, place your pillow on top to measure sides (if you don't already know the measurements). I left about 1/2 inch all around to get an accurate fit for my pillow.
Try to line up your sides as close as possible. It should be pretty close.
Pin three sides of the pillow and about 2 inches in from each corner on the unpinned side. Sew with a 5/8 inch seam allowance. Be sure not to sew the opening where you will put the pillow form in.
Turn pillowcase right side out, pushing corners all the way out. Insert pillow form or polyfill and pin the opening closed. You will sew close to the edge to make the least visible as possible.
Voila! You're done. Super easy and a fun addition to my Christmas decor.
I made two of these chevron pillows and I love them! They are Merry & Bright! You can find out how to make the Monogram Pillow using this method here.
 
I'm linking up with some of these parties!