Showing posts with label skirt. Show all posts

Friday, May 2, 2014

Tiered Petal Skirt {Tutorial Link}

I'm bringing back one of my favorite skirt tutorials today that I originally posted 2 years ago! I loved making this skirt and plan to make a bigger one for one of my girls soon. This is an intermediate sewing project, but if you're just a beginner don't let that intimidate you! Take it one step at a time and you'll do fine! Enjoy!

I've been busy making my girls' Easter skirts and today I finished the second of three. You can find the first one here. This one today is {in my humble opinion} absolutely adorable!! It is because of the type of skirt, but more importantly, the fabric pattern that it is so cute. I am a sucker for polka dots. Add navy blue to the mix and I'm sold! I found this skirt on Pinterest, but here is a direct link to the instructions. She did an excellent job on the instructions for this skirt. It's very easy, just a little time consuming. {Totally worth it!}


Thanks for stopping by!
post signature

Friday, January 10, 2014

Lined Handkerchief Skirt {+ Matching Appliqued Shirt}

This skirt is probably one of the easiest skirts to make for your daughter. It is just like making this elastic waist skirt, but there's no hemming and this one is lined. The only seams you're sewing are side seams and around the waist and it's surprisingly simple! You can make an entire outfit for less than $10. Handmade. Monogrammed. It's never been easier. Are you ready to try it?

For this skirt, I bought 4 handkerchiefs from Hobby Lobby @ .99 cents/each. Two printed handkerchiefs and two white ones for the lining. There are many possibilities with handkerchiefs. I made this for my 5 1/2 year old daughter, but could probably still make skirts out of handkerchiefs for my very tall 8 year old and petite 10 year old. You only need at most 2 inches for folding over the top edge for the waist and there's no hemming so that leaves a good bit of fabric for the length. If the length is a problem, you could always add cute trim to the bottom.

Now that you've got the handkerchiefs, measure how long you'll need the skirt to be from waist to length. I leave the width as is. Elastic takes care of the width, so don't worry about cutting it down unless you're making this for a baby or young toddler. Check out this chart for more info on sizing and measurements.
Once you have your waist to hem measurement, mark and cut your handkerchief length, if necessary. This will be the only cut edge of the entire skirt. Do the same thing for the lining handkerchiefs. I kept mine the same length as the patterned handkerchiefs, but you can make the lining an inch or so shorter if you wish. {You could also do the lining piece longer than the patterned ones, for a layered look.}
Now, take your patterned pieces and lay them right sides together. Lining up the sides as best you can. Make sure the cut edges are lined up.
Pin the sides right sides together.

Sew each side seam. 5/8" is the standard seam allowance.

Repeat with the lining pieces.

Now, put the lining inside the patterned pieces as if it were finished. Note: the lining piece should have seams facing outward toward the patterned pieces' seams. This allows the inside of the lining that touches the body to be smooth. Basically, the lining appears insideout.
Once you have both the skirt and lining together, flip them together insideout so that the lining is now on the outside and the skirt in inside. Now, fold both rough edges (waist) over an 1.5 inches. Pin the rough edge to hold it in place.
Now, sew around the rough edge to make a seam. You will sew all the way around and leave about 3 inches unsewn so that you can thread the elastic through the waistband.

Once elastic is threaded through, sew the ends of the elastic together and then sew the 3 inch opening closed.
Flip the skirt right side out and you're done!
 
Make a matching shirt by using one of these methods for making an applique: I used my Silhouette Portrait to cut out my A with the heat n bond on the back. All I had to do was iron it onto my shirt and sew around the applique for reinforcement. You can still make this without a Silhouette - print out a letter in any font you like with your printer, cut it out and pin or trace it to your choice of fabric. Iron your fabric to Heat n Bond following package instructions. Cut out the fabric and then iron it to your shirt. Stitch around the edge to reinforce it.

Make it even more personal by embroidering the name next to the letter or by adding embellishments, etc. I added the name just to give it a little extra pizzazz! I love how it turned out and so does my sweet girly girl. {Pic of the finished product coming soon!}

Thanks for stopping by today! Hope you'll try this easy skirt and if you do, please come back and tell me how it went!
post signature

Monday, November 4, 2013

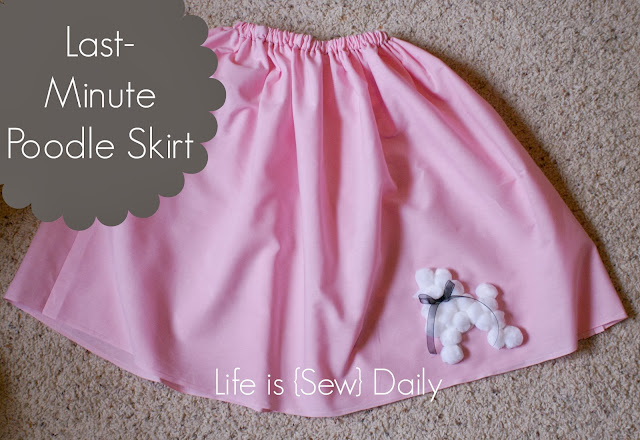
How to Make a Last-Minute Poodle Skirt

When your daughter comes to you the week of Halloween during your last week of blogging for 31 Days straight and it's one of your busiest weeks with various other activities going on and tells you she needs a poodle skirt, what are you suppose to do? The only option I had was to make one. And it just so happened that I had no time to do it until the day before the 50th Day of School Celebration. Our K5ers celebrate the 50th day by having a sock hop and doing all kinds of activities around the number 50. The kids are encouraged to dress in 50's fashion, although they have no clue what that means, and my little princess just had to have a poodle skirt. So, this is how I did it. And if you find yourself suddenly needing a poodle skirt, this tutorial is for you!

Please keep in mind that this tutorial is costume quality - meaning it will not be sewn exactly by the rules. My goal was to make a skirt as quickly as possible with as little resources possible. I literally made this in 30 minutes (if you exclude the breaks I had to take to run 3 different unrelated errands in between time). It will still last for years if it is properly taken care of.

NEXT:
With right sides of fabric together, sew each side seam together using a standard stitch with 3/4" seam allowance. Pin each side first if you need to.
THEN:
Turn right side out and fold over the rough cut edge about 1 inch. {If you want a finished seam on the inside of waistband, fold over once - iron. Then, fold over again - iron.} Now, sew a seam close to the bottom edge of the section you just folded over. Remember to leave about a 3 inch wide opening so you have room to slide in your elastic. Slide in your elastic and sew the opening closed.
For a full tutorial on sewing an elastic waist skirt, go here.
 
I found mine here. I printed it and then enlarged it on my copier to 150%.


My little 50's girl had a swell day making a fruit loop necklace with 50 pieces, crafting several things about the #50 and hula hooping at her sock hop while drinking her first coke float. I'd say it was a good day! I only wish I had taken a pic of her before school!

Like this post? Will you please share it with your friends on your social media? You can also follow me on Facebook, Google+, Pinterest and Twitter. Click the social media icon of your choice in the right sidebar.

Thanks for reading! I hope you come back soon!
post signature

Thursday, April 26, 2012

Chevron Skirt {Tutorial}


I finally did it! I found some of the ever-popular Chevron fabric {in the exact color I wanted!!} at my local Hobby Lobby last week and made the skirt I've been dreaming about. It is done exactly the same way as THIS SKIRT I posted about before. The only addition to this skirt is lining up the stripes on the sides for a crisp look. Before you turn around and run, believe me when I say this sounds much harder than it really is. I wouldn't do it if it was too much work. I don't have time for that. So, take the plunge and try it! You won't be disappointed. *This fabric is cotton duck and it was a dream to work with. Not to mention, it looks so professional when worn.*


 EASY ZIPPER TUTORIAL

I'm linking to some of these blogs!

Thursday, April 12, 2012

Basic Ladies' Skirt {Tutorial}


I have found that I love a summer skirt way better than I love shorts. And here's my list of reasons why skirts are better than shorts:
1. Everyone looks better in a skirt.
2. Skirts can be very casual, semi-casual, business casual, semi-dressy or very dressy.
3. Skirts can be worn with a variety of shoes, my favorite being the flip flop or wedge sandal.
4. Skirts can be worn anywhere. I've even gone putt-putt in a skirt and wedge sandals. It's perfectly acceptable.
5. Skirts are way more comfortable than shorts and more airy.
I don't mind a pair of shorts every once in awhile, but I just find that I prefer skirts more. And because they are so super easy to make and fabric is so cheap, you can make a variety to last all summer for the price of one department store skirt.
Here's how to do it!
Start by getting out your favorite skirt. Simple is best for this tutorial.


I'm linking to some of these parties!