Showing posts with label recipe. Show all posts

Friday, April 25, 2014

Easy Two Ingredient Ice Cream Cake

This post is brought to you from my other blog Living the Allergic Life. We just celebrated our 2nd of 3 birthdays this month and I wanted to share with you a great alternative to your everyday birthday cake. It's a VERY simple ice cream cake and although the below has allergy-friendly suggestions, you could easily make this with your normal ingredients. In 20 minutes or less, you can have your ice cream cake.....and eat it, too!
It's that time of year again! Birthday times three at our house this month. And when you have a family member with food allergies, it's time to bake up {or freeze up} some creativity! We are kind of burnt out on the same ol' cupcakes all the time, so this year we decided for the first birthday of the month {which was mine} to just take the family to Bruster's Ice Cream. There we can all get what we want, including my daughter who is allergic to milk, eggs and peanuts. She loves their italian ice and sorbet options. There are about 4 or 5 different flavors to choose from at any given time so it was a great non-cupcake option.
The next birthday was my 6 year old's birthday and she wanted a cake. However, still being kinda sick of the normal cakes we make for birthdays, I decided to make an ice cream cake. We do love an ice cream cake around here, but with my 8 year old not able to eat store bought ice cream cakes because of the obvious milk factor, making one was my best option.
You will not believe how simple this is! It literally took about 20 minutes to make. Less time than baking a cake!!

To make this you'll need either Tofutti brand ice cream sandwiches or SO Delicious brand ice cream sandwiches. I bought SO Delicious brand for this cake at Publix.

You also need Pillsbury Classic White frosting (contains soy) OR another allergy-friendly one suited to your specific needs.

And then whatever toppings you want to use to decorate your cake. I bought Nerds & matching gumballs from the Dollar Tree to decorate ours.
To put this cake together, just stack your ice cream sandwiches on whatever size plate or dish you want and arrange them in the desired shape. I used a rectangular dish and it worked perfectly! Then, quickly spread the room temperature frosting onto your cake, covering as good as you can. Next, I put mine right in the freezer to firm up because ice cream sandwiches melt pretty quickly and ain't nobody got time for that! Nobody. This is when I ran to the Dollar Tree because I realized I needed sprinkles or something to put on my cake. As soon as I got home, I took it out of the freezer and decided to smooth out the frosting to make it look more professional. I put a butter knife in ice cold water and then, took it out and immediately started spreading out the frosting. It REALLY made a big difference and a much smoother appearance. You'll need to reinsert the knife into the ice water a few times throughout the process to keep it nice and cold. Then, when you get it looking the way you want, decorate it! Finally, refreeze it until it's time to party!

The cake cuts very nicely and looks like a layered cake on the inside! My kids called me 'The Best Cake Maker in the World' and said things like, "You should start your own business!"
Mission Accomplished. Amen?

Happy Ice Cream Cake Making to You and Yours!
post signature

Wednesday, February 19, 2014

Pioneer Woman's Chicken Tortilla Soup {Link}

Sometimes I just crave a good soup. They're generally simple to make and last awhile. It's the perfect comfort food when you just want a nice, relaxing evening without all the fuss of cleaning up. Last night, the Hubs was really wanting some soup after being gone for a week and eating out the whole time so I did a quick search and thought this one sounded so good.
Let me tell you, folks, it did not disappoint!  If you are looking for a good soup to try, this is it! I'm adding this to my menu rotation.

The only modifications I made were at the beginning. After sauteeing the peppers/onions and adding the Rotel, I pureed it in my food processor because my husband doesn't care for chunky veggies in the soup. It was still very tasty!

You can go here to try out Pioneer Woman's Chicken Tortilla Soup. Lip smackin' good!
post signature

Thursday, December 5, 2013

Did Somebody Say Party?? OREO Cookie Balls {Recipe}

This recipe comes from my food allergy blog, Living the Allergic Life. It's one I developed into a dairy-free, nut-free, and egg-free version for my daughter to enjoy, but it would be just as delicious using milk based products instead. Give it a try! These are so easy and yummy, you won't be able to stand it!!

Let me introduce you to Milk's favorite cookie ball! Yes, it is made with OREOs. {I used Whole Foods brand because I was there and didn't want to make another stop just to get OREO brand, but OREO brand is still free of dairy, nuts and eggs.} I have sent these to school as a class treat and make them during the holidays for a special treat. Always delicious!

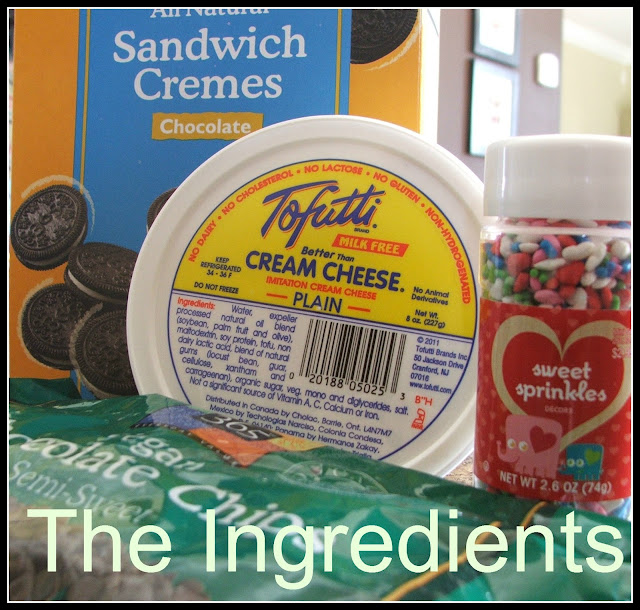
You'll want to have these things on hand:
  • OREOs
  • 8 oz. Cream Cheese {I used dairy-free}
  • 1 bag chocolate chips, any flavor {I used vegan}
  • Candy Sprinkles


Then, you'll want to freeze these cookie balls for about 10 minutes. While they are setting up, melt your vegan chocolate chips {for every 6 oz of chips, add 1T shortening - this will aid in the dipping process} in a microwave safe bowl on high for 1 minute. Stir, then continue heating/stirring every 15 seconds until completely melted and liquid. Dip the cookie balls in the melted chocolate and immediately sprinkle with fun sprinkles. Once done, put them back in the fridge for about 1 hour.

What's one of your favorite snacks to make for the holidays? If you have a blog post about it, link yours in the comments. I'd love to see what you make!

Like this post? Will you please share it with your friends on your social media? You can also follow me on Facebook, Google+, Pinterest and Twitter. Click the social media icon of your choice in the right sidebar.

Thanks for stopping by! Sharing this with a few of these friends.
post signature

Wednesday, December 4, 2013

Sandwich for a Crowd {Recipe}

 
If you're looking for a delectable savory food to take to an upcoming party or get-together this holiday season, look no further! This is my most favorite party food ever!! It's even a good choice to feed your host of relatives at Christmas or New Year's.

This Sandwich for a Crowd is always a big hit when I make it. I just made it for a bridal shower a few weeks ago and had lots of people comment on how much they loved it. I make this for my family every once in awhile and we love it. This sandwich comes with a warning, though: Have plenty of people present to help you eat it - or you'll eat the whole thing yourself. {Don't ask me how I know.}

Here's the delicious recipe!

1 wide loaf soft bread {Italian loaf or French Bread in bakery section}
1 block cream cheese, softened
1/2 cup Mayonnaise {optional}
3 T Worcestershire
1 1/2 cups cheddar cheese, shredded
1 T garlic salt
chopped green onions {or 1T onion powder}
Deli ham or turkey
Cut bread loaf in half lengthwise.
Pull some of the bread away from the center of the loaf, just enough to make a little dent. This sandwich is loaded and needs a little extra space.
 
Mix together cream cheese, mayo, worcestershire, cheese, garlic salt and onions.
Spread this onto each side of the bread. Cover every part of the inside of the bread on each piece.
Now, place sliced of ham or turkey {as many or little as you wish} onto the bottom piece of the loaf.
Put the top piece of loaf onto the top. This will look like a giant sub sandwich.
 
Wrap in plastic wrap tightly and chill in fridge for at least an hour.
 
Once chilled, unwrap sandwich and slice the entire loaf into 1 inch thick slices.
Feed the hungry crowd!

What do you feed your crowd? Have a favorite that you always bring to the party?

Thanks for stopping by! I'm sharing this with a few of these people.
post signature

Thursday, November 7, 2013

Dum Dum Cookie Pops {recipe}

{This post is from my food allergy blog, Living the Allergic Life}
We love a good, fun snack in this house and these Dum Dum Cookie Pops are such a happy treat! I love these as an alternative to sending cupcakes to school for birthdays. {Although, our school does not allow birthday treats anymore because of food allergy concerns.} These are a super easy treat and are a great way to use up the Dum Dums at the bottom of the Halloween bag this season. The only exception is that mine are mostly allergy-free for my daughter who lives with 3 major food allergies! You can use regular milk and any sugar cookie mix or recipe for these, just as easily. SO EASY and FUN! Hope you enjoy!

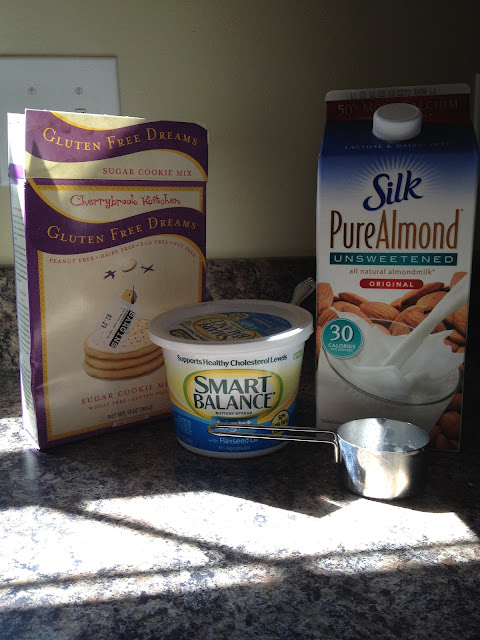
I used the Cherrybrook Kitchen Sugar Cookie Mix {thanks, Dayna!} and followed the instructions on the box using Smart Balance Light {dairy-free}and unsweetened Almond Milk {dairy-free}. Mix according to package directions and drop onto greased cookie sheet.
Then, simply unwrap and press a Dum Dum Lollipop into the center of each cookie dough. Bake at 325 degrees for 12-14 minutes. Let cool on a cooling rack. Package up individually for a great classroom treat!
What's not to love?
Buy your ingredients here:
Dum Dum Pops, 200-Count

Like this post? Will you please share it with your friends on your social media? You can also follow me on Facebook, Google+, Pinterest and Twitter. Click the social media icon of your choice in the right sidebar.

post signature

Saturday, October 5, 2013

The Key Ingredient to the Recipe of Success

There are many aspects of this domestic life we live. Part of it is very hands-on, some of it involves mental  and physical preparation. Mix in a little frustration and a lot of challenges and it doesn't always look as glamourous as the life we'd imagined. But there's one aspect of this domestic life that really makes an impact and makes it all worth it. That four letter word. L-O-V-E.
Love is a game changer. Love is what makes your house a home. Love is what people remember long after the dust has settled. It's the glue that holds it all together when things don't seem to go the way we planned. There are so many ways to show love in what we do.
My grandmother is an expert quilter. I say expert because she's been quilting for decades. She told me a few months ago that she's likely made and given away over 300 quilts in her lifetime. It's what she does very well. She has 12 grandchildren and gave each of us a handmade quilt years ago. Currently, she has 17 great grandchildren and she has made a quilt for most of them, too, now. I think she only has 5 or so left to make. She makes them all by hand. Every stitch. That adds up to millions of stitches after all these years!
I know that at any given time I can walk in her house and find a quilt in progress. This is her labor of love for all of us who are recipients of these precious pieces of art. She spends hours and hours on each quilt, but continues to make them. Love does that. It endures. Through the happy times, through the daily mundane, through the crazy times of life and even when things get tough. When we have to rip out the seam and start all over again? That's love. It never gives up. And it's the secret ingredient to leaving a legacy long after this domestic life is over. It's what the ones we love will remember most about us. It's the key ingredient.

The Greatest Gift - I Corinthians 13:1-8
13 Though I speak with the tongues of men and of angels, but have not love, I have become sounding brass or a clanging cymbal. 2 And though I have the gift of prophecy, and understand all mysteries and all knowledge, and though I have all faith, so that I could remove mountains, but have not love, I am nothing. 3 And though I bestow all my goods to feed the poor, and though I give my body to be burned,[a] but have not love, it profits me nothing.
4 Love suffers long and is kind; love does not envy; love does not parade itself, is not puffed up; 5 does not behave rudely, does not seek its own, is not provoked, thinks no evil; 6 does not rejoice in sin, but rejoices in the truth; 7 bears all things, believes all things, hopes all things, endures all things.
8 Love never fails.
 
I'm sharing this with some of these friends.
 
This is part of my 31 Days of Home Economics. You can find links to all my other posts here.
post signature

Tuesday, July 9, 2013

Individual Blackberry Cobblers {Dairy-Free Recipe}

As I mentioned in this post, we picked wild blackberries this past weekend. My girls have never had any kind of cobbler and because I had more berries than we would ever be able to eat before they went bad, I decided to make a cobbler. My second child cannot eat dairy because of a severe food allergy, so I substituted the milk for almond milk and the butter for Smart Balance Light. It turned out perfect!

I decided to try individual cobblers using a muffin tin instead of making one big pan and I believe I like this way much better. It isn't as mushy and seems to be just the perfect consistency. Absolutely delicious!

Here's how...
{slightly adapted from The Pioneer Woman's recipe.}
 Wash about 2 cups blackberries.
Mix 1 cup self-rising flour + 1 cup sugar + 1 cup almond milk + 1 stick Smart Balance Light, melted. Grease muffin tin. Fill each tin 1/2 full with batter. Drop 5 blackberries into each tin. Bake @ 350 until brown and bubbly.
 

Sharing this with some of these friends.

Thanks for stopping by!

Monday, July 8, 2013

Wild Blackberry Jam {Recipe}

It's summertime and if there's one thing that reminds me of summertime in my childhood, it's blackberry jam. My mamaw made the best blackberry jam every summer. She'd serve it with her made from scratch biscuits as part of her "big, country breakfast". My papaw was notorious for taking a scoop or two of the jam and putting it on his plate, then laying a pat of butter on top. He'd take his fork and mash it together and oh.my.word. it was absolutely heavenly. You could put it on your biscuit or just eat it with a fork as I did more than a few times. I miss those days so much and think of my grandparents every summer when I see the wild blackberries growing.

The other day, my husband saw hundreds of wild blackberries growing about a mile from home and although he doesn't eat them, he helped me pick almost a bushel of the biggest blackberries I've ever seen. I think he's still picking the little prickers out of his hands and arms. So, despite my efforts to stay away from sugar, I decided that for the sake of my girls {who never had the privilege of having Mamaw's jam} I'd make some. I also made a cobbler. {Stay tuned for that recipe!} It is a big hit! They are really looking forward to breakfast tomorrow.

Here's the recipe!


Sharing this with some of these friends!

Thanks for stopping by!


Friday, June 7, 2013

Broccoli Kale Quinoa {recipe}

With Summer having made its arrival here in the South, I have been looking for some new summer salads and dishes to make. I've been learning to change my eating habits this year and the goal is to eat more of the superfoods and less of the sugary foods. I've witnessed dramatic changes in my health and the way I feel in general, so it's been worth it. This little gem of a recipe would be delicious all year long, but especially in summer. It literally takes about 20 minutes start to finish!

Broccoli Kale Quinoa
{slightly adapted from this recipe}
 
1 cup quinoa, rinsed
 
2 cups broth {for cooking quinoa, can sub water}
 
Cook according to package directions. Takes about 15 minutes or until quinoa has sprouted.
 
2 Tbsp oil
 
1/2 cup onion, chopped {can sub onion powder}
 
2 cloves garlic, minced {can sub garlic salt}
 
1/2 cup broth
 
1 large head broccoli, chopped into small florets
 
1 large bunch of kale, washed & chopped {or two giant handfuls from the bag}
 
Orange bell pepper, chopped {I used 1/2 cup orange sweet pepper}
 
1 cup parmesean cheese, shredded {more or less as desired}
 
Meanwhile, in a large saute pan, heat up 2 Tbsp oil. Add onion and garlic. Saute until onion is almost translucent. Add broth, broccoli, kale & peppers. Cover and simmer until kale is just wilted.
 
Place quinoa into a serving dish. Cover with parmesean cheese. Add broccoli/kale mixture to quinoa. Mix carefully. Add more cheese as desired.

This dish is so tasty and so healthy! You might not want to share it.
 
Thanks for stopping by! I'm sharing this recipe with some of these friends.

Monday, April 1, 2013

Tomato Bisque {Mmm Mmm Monday}

Who doesn't love a good comfort food? Soup is in my comfort food category and I think you might love this one too! My mom found this and shared it with me. You can find the recipe on my food allergy blog, Living the Allergic Life, but I thought I'd share the pics with you here.


This takes tomato soup to a whole new level! It was very quick and easy to make. So, make this your next rainy day meal! Add a little grilled cheese and you're set!

Recipe here.